Thursday, December 10, 2015

RemARKables Blog Tour - December

December RemARKables Blog Tour - Antler Tree


In early October I went to Jackson Hole, Wyoming and in the center of town the Boy Scouts put up antlers for each of the entrances to the Plaza. Here's some pictures of one  at night and day.


So of course I had to make an Antler tree!


For this card I used the RETIRING stamp set Wonderland - get it quick before it's gone! I inked half the stamp and carefully placed it so it might look tree-like. I used the Project Life December 2016 red enamel dots (Retiring!), but you might want to substitute the Home for Christmas Enamel Dots (Retiring!!) The candy cane ribbon is also retiring!

And the recipe:


and I have to leave you with an amazing sunset picture from the Tetons:


Click HERE for the next stop on the Blog Tour:


image1.JPG


Nancy Amato


Arden Dougan - That's me!


Monday, November 23, 2015

Favorite Items of the Day ON SALE

You can make this all from items on sale this week! Just add paper and a Big Shot!

Buy now and save $33.60!
Sale prices are below


Monday, November 16, 2015

Wreaths

I decided to use one of my favorite bundles: Wondrous Wreath. For my sample I chose the Peaceful Wreath stamp that's in the Holiday Catalog There's one more stamp that matches the die  - and if you count the Circle of Spring Stamp set - that's a real deal - three wreath stamps that all go with one die! Wreaths work with every season and they are such fun to make!

Here's my card:

and a closeup:

I embossed the wreath with gold embossing powder and watercolored the leaves with Mossy Meadow and my Aqua Painter. I used my Cherry Cobbler Stampin' Write marker to color the berries. I tried watercoloring, but the berries were too pastel.

If you want to check out another card with the Wondrous Wreath bundle and a similar layout with a Vintage look - click here! (The dictionary stamp is now retired.)

and the recipe:


Thursday, November 12, 2015

RemARKable Blog Tour - November


Penguins are so much fun! This month I decided to try out my Snow Place Bundle. I had a penguin tree in mind after seeing Donna Mundinger's card she did with Cricut. In my variation, I made six penguins and dressed them with a glimmer paper top hat and dazzling diamonds for the Santa Hat fur. I can just imagine them dancing!


 I hand-cut a tree card. I drew a tree 5-1/2" tall by 5" wide at the base. I cut one tree with Whisper White thick cardstock and one with Dazzling Diamonds Glimmer Paper. I put them together with the new tear-away adhesive.


Here's the bundle:

http://www.stampinup.net/esuite/home/stampinarden/


http://www.stampinup.net/esuite/home/traciesallaboutstamping/blog?directBlogUrl=/blog/86481/entry/remarkable_stampers_blog_tour_bundle 

Thanks for stopping by! See you next month! Click on Tracie Langley for your next blog.


Arden Dougan - that's me!


and the recipe
Built for Free Using: My Stampin Blog

Friday, October 30, 2015

Happy Halloween Tutorial

Happy Halloween! I posted a tutorial on how to do the Quoth the Raven card! Check it out under Instruction Sheets or here!

Monday, October 12, 2015

Peaceful Trees

I love white on white cards!! I made this one with the new Woodlands folder. It's tough to photograph white on white cards. There's some Dazzling Details on the branches - just hard to see.


Built for Free Using: My Stampin Blog

Saturday, October 10, 2015

October Newsletter - get yours today!

I just finished my October Newsletter - let me know if you want a copy - it includes Joseph's Coat Technique, tips on the Acorn Punch, a Comparison of Black Inks, Into the Wild Sour Cream Container and a Halloween Treat Bag. Subscribe to the right.


Thursday, October 8, 2015

RemARKable Blog Tour - October

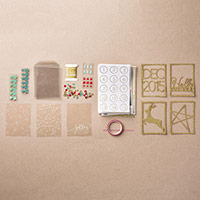
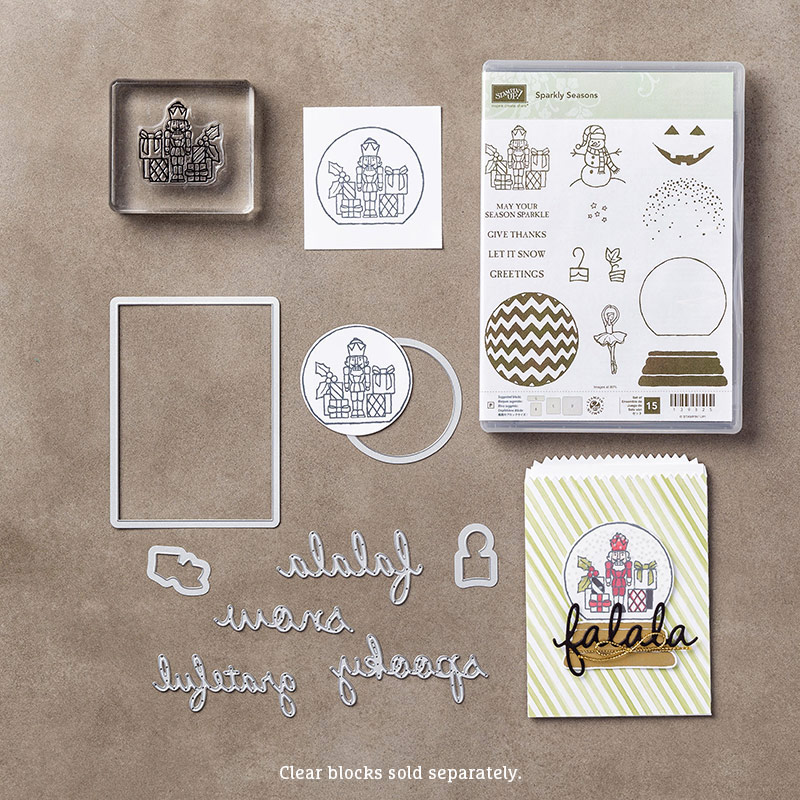
Thank you for stopping by on the RemARKable Blog Tour. This month, I decided to use the Sparkly Seasons Bundle from the new Holiday Catalog.

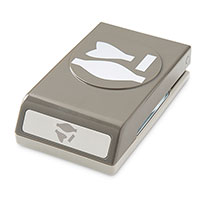
For my project I did a little Luminary using the new Gift Bag Punch Board.


I just had to share my quilt in progress too! Cute cat, huh?

They are a little tricky to make - here's how:

Cut a piece of Basic Black paper 6" x 10"  and use the Gift Bag Punch Board to cut out a Small bag. Fold on the fold-lines and press the top together so you only see the front of the bag.

Now use the Mini Treat Bag die to cut the top of the gift bag so that it looked like you used Pinking Shears. But as we all know - those are for fabric!!! This is tricky - you want to put the bottom of the bag above the die and the top of the bag under the die. or you can cheat like I did and only run the Big Shot into the first inch or so.


And now it's time to use the Sparkly Seasons Bundle! You need the circle die. Fold the bag so that you can cut the front and the back of the bag at once in the Big Shot.

 Now cut two 2.5" x 3.5" pieces of Vellum and attach to the back of the Gift Bag where the circles are. Stamp the Jack-o-Lantern face on the vellum circles with black Staz-On. Let dry.

Put the bag together. You will need to cut a notch in the small side so it doesn't show in the vellum circle.

Add tea lights and you have a Luminary. I added a little piece of Spider web on the top for bling. Now you have a safe Luminary that you can use for Halloween!

Here's the Sparkly Seasons Bundle and my ingredients below: Don't forget the tea light! 


Thank you for joining me on the tour - see you next month!


And you are now ready to hop over to the next Blog on the Tour!

Next Blog


Arden Dougan  - That's Me!


Related Posts Plugin for WordPress, Blogger...